3dArt
Home
April 2005
Not a tutorial. Just me, learning how to get rid of seams in a uv character map.
There are other ways to do this but I'm going with this way for now.
I'll practice with other options on a future model.
Image on the left shows a seam running along the middle of the arm. Image on the right
shows the arm with no seam. The seam is removed by texture blending - using Photoshop
alpha channels to fade the edges of overlapping uv textures.
 |  |
The red numbers scribbled over the image are just a quick way to show where the image wraps around.
Notice how the 1 and 8 are at opposite ends on the flat texture below, but on the arm they meet at
the seam where the texture wraps around the model. Images in Photoshop, below, from left to right are
the painted texture, the alpha channel, and a composite of the two with the alpha shown in red. The
alpha channel controls the transparency of the texture. Black = 100% transparency. White = 0% transparency.
Using a gradient produces a gradual fade from solid texture (0% transparency) to no texture (100% transparency).
 |
 |
 |
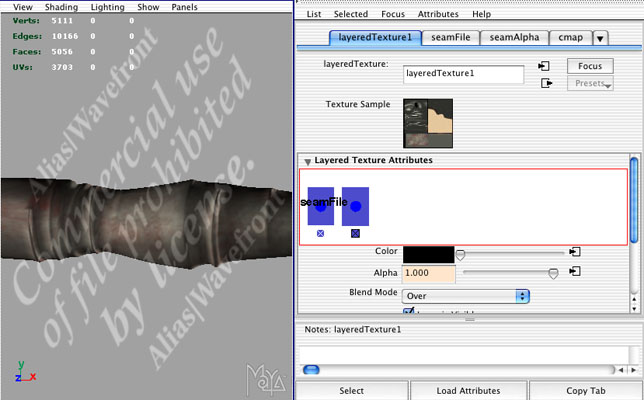
Settings in Maya: In Photoshop, I saved the tiff file with the alpha channel. In Maya, using Layered Textures, I input the same
file in the Color node and the Alpha node. If a file has an alpha channel, the alpha node uses it to control transparency.
I used UV Linking to connect the correct uv to the correct image file. The second file is the same texture file with
a different alpha channel created for the second overlapping uv. I keep a copy of the texture file as a layered Photoshop
file for editing.
 |
 |  |
In Maya, here are the two arm UVs which overlap on the final model. The yellow points show the edge of the UVs.
The images on the right show were the edges meet on the model, creating the seams. Since the seam edges
of the first uv are in the transparent area (shown in gray) of the alpha image, that area is transparent,
showing the second texture underneath. Because of the gradients, the two textures fade into each other.
 |  |
 |  |
More practice, this time in Lightwave. A Lightwave model with seams visible on the arms.
 |
|
| On the left is the arm texture with the alpha channel in Photoshop. I saved the alpha channel as a separate file for use as a Lightwave texture layer. On the right, the Lightwave Surface Editor settings show the file used as a texture layer. Note the Blending Mode for the top layer is Alpha which controls the transparency of the layer immediately below it. |
|
 |
 |
| I temporarily substituted a checkerboard image for one texture so that I could easily see where the two textures overlapped and needed adjusting. |
|
 |
|
 |
|
| Seam removed. | |
 |