 |
| acUVMoveShell.mel |
Move UV shell in the UV Texture Editor window by aligning right, left, top, or bottom of the shell to an absolute position. |
| acUVFlipToLeft.mel |
Flips mirrored UV shell and positions it to left of original shell. Instructions: Copy script to your scripts folder. Assign script to a hotkey or shelf icon. In Maya viewport, select one or more UVs on mirrored side of your model. Run script. In the UV Texture Editor, the shell is flipped and repositioned. |
| acUVFlipToTop.mel |
Flips mirrored UV shell and positions it to top of original shell. Instructions: Copy script to your scripts folder. Assign script to a hotkey or shelf icon. In Maya viewport, select one or more UVs on mirrored side of your model. Run script. In the UV Texture Editor, the shell is flipped and repositioned. |
| acUVFlipToBottom.mel |
Flips mirrored UV shell and positions it to bottom of original shell. Instructions: Copy script to your scripts folder. Assign script to a hotkey or shelf icon. In Maya viewport, select one or more UVs on mirrored side of your model. Run script. In the UV Texture Editor, the shell is flipped and repositioned. |
| acAlignLocator.mel |
Align locator to joint. Create locator and automatically align with selected. Instructions - Select joint. Click Locator button. Move locator/object to joint's pivot position. Instructions - Select joint. Shift-select locator or object. Click the Align button. Move locator/object pivot point. Instructions - Select joint. Shift-select locator or object. Click Match Pivot button. Additional buttons for creating nurbs box and arrow controllers. These are not automatically aligned. To align to a joint: select the joint, shift-select the nurbs object, and click the Align button. |
| acFingerCurl.mel |
A quick Set Driven Key setup of fingers and thumb rotation. Select a locator, 12 finger joints, and 3 thumb joints. (It is important to select thumb joints last.) Run script. New curl attribute of locator drives rotation of fingers. Use sliders in locator attribute editor to move fingers. |
| acRenderPrintCalculator.mel |
Calculate print size. Also shows file size. |
| acImagePlaneSliders.mel |
Sliders for positioning and sizing imagePlane for quick setup of reference images. |
| acSelectByPosition.mel |
Selects all vertices within selected objects that have xyz position within a maximum and minimum range. Adjust the range using the minimum and maximum sliders. |
| acMatchPoints.mel |
Opens a window for aligning two or more endpoints to meet or touch. Good for working with nurbs, birails, etc. Select a point. Click the Point Position button. Select one or more points. Click the Align End Points button. All points selected align to the point position of the first point. Revised May 27, 2007. |
| acMoveUV.mel |
Edited the acMatchPoints script to create this script for moving UVs in UV Editor. |
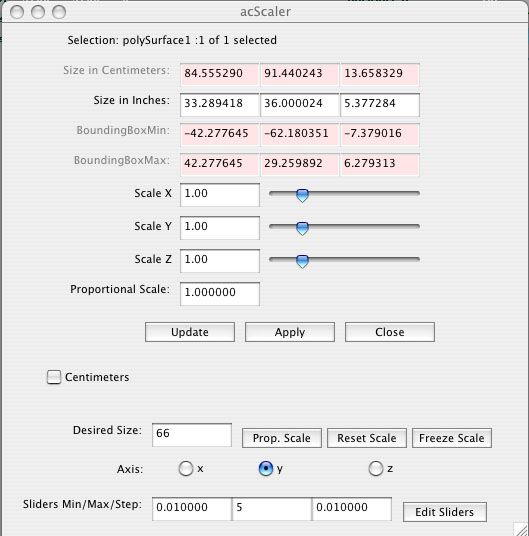
| acScaler.mel |
Proportionate scaling dialog box. Desired scaled size in inches or centimeters. Enter desired scaled size in one axis. Other axes scale by same proportion. Shows bounding box information. Object size shown in centimeters and inches. Revised: May 23, 2007 |
| acPlanar.mel |
Adjusts edges of a non-planar polygon by changing the angle between two vertices to match the angle between two vertices on the opposite side. Revised May 15, 2007. |
| acPivotComponents.mel |
Replaces acPivot script. Creates a panel to move the pivot point to the last selected vertex's point position. Instructions: (IMPORTANT: In Tool Settings>Rotate Settings and Scale Settings, enable "COMPONENT USE OBJECT PIVOT" checkbox. 1.Select vertex of an object. 2.Press the Point Position button. Shows xyz position. 3.Press the Move Pivot button. Pivot moves to new position. 4.Select a group of vertices, edges, or faces and rotate or scale from the new pivot point. |
|